當你在網路填寫問卷或者生日時,
通常都會有這類的下拉式選單,
只要把字面上改一下就能夠有不同的功用唷
範例 Spinnertest
程式碼部分
main
<?xml version="1.0" encoding="utf-8"?>
<AbsoluteLayout
android:id="@+id/widget29"
android:layout_width="fill_parent"
android:layout_height="fill_parent"
xmlns:android="http://schemas.android.com/apk/res/android"
>
<Spinner
android:id="@+id/spinner"
android:layout_width="wrap_content"
android:layout_height="wrap_content"
android:layout_x="120px"
android:layout_y="112px"
>
</Spinner>
</AbsoluteLayout>
--------------------------------------------------------------------------------------
主程式部分
package com.demo.android.spinnertest;
import android.app.Activity;
import android.os.Bundle;
import android.view.View;
import android.widget.AdapterView;
import android.widget.ArrayAdapter;
import android.widget.Spinner;
import android.widget.Toast;
public class Spinnertest extends Activity {
/** Called when the activity is first created. */
@Override
public void onCreate(Bundle savedInstanceState) {
super.onCreate(savedInstanceState);
setContentView(R.layout.main);
findview();
//建立一個ArrayAdapter物件,並且存放下拉式選單的內容
ArrayAdapter<String> adapter = new ArrayAdapter<String>(this,android.R.layout.simple_spinner_item,new String[]{"Screen","Keyboard","Mouse"});
//設定Spinner的樣式
adapter.setDropDownViewResource(android.R.layout.simple_spinner_dropdown_item);
//設定adapter 將剛剛的下拉式選單內容 給這個widget
spinner.setAdapter(adapter);
spinner.setOnItemSelectedListener(spinnerListener);
}
private void findview() {
spinner = (Spinner) findViewById(R.id.spinner);
}
private Spinner spinner;
//監聽下拉式選單 是否被選擇
private Spinner.OnItemSelectedListener spinnerListener= new Spinner.OnItemSelectedListener()
{
//如果被選擇
public void onItemSelected(AdapterView<?>adapterView, View v, int position, long id)
{
//利用Toast來顯示 Toast.LENGTH_LONG則表示 顯示時間長
//Spinnertest.this 則代表指向Spinnertest這個實例 若是寫成this則是指向OnItemSelectedListener這個實例
//最後用show()將Toast 元件顯示在螢幕上
Toast.makeText(Spinnertest.this, "You select"+adapterView.getSelectedItem().toString(), Toast.LENGTH_LONG).show();
}
//若是沒有選擇任何項目
public void onNothingSelected(AdapterView<?>adapterView)
{
Toast.makeText(Spinnertest.this, "You don't select anything", Toast.LENGTH_LONG).show();
}
};
}
執行畫面截圖
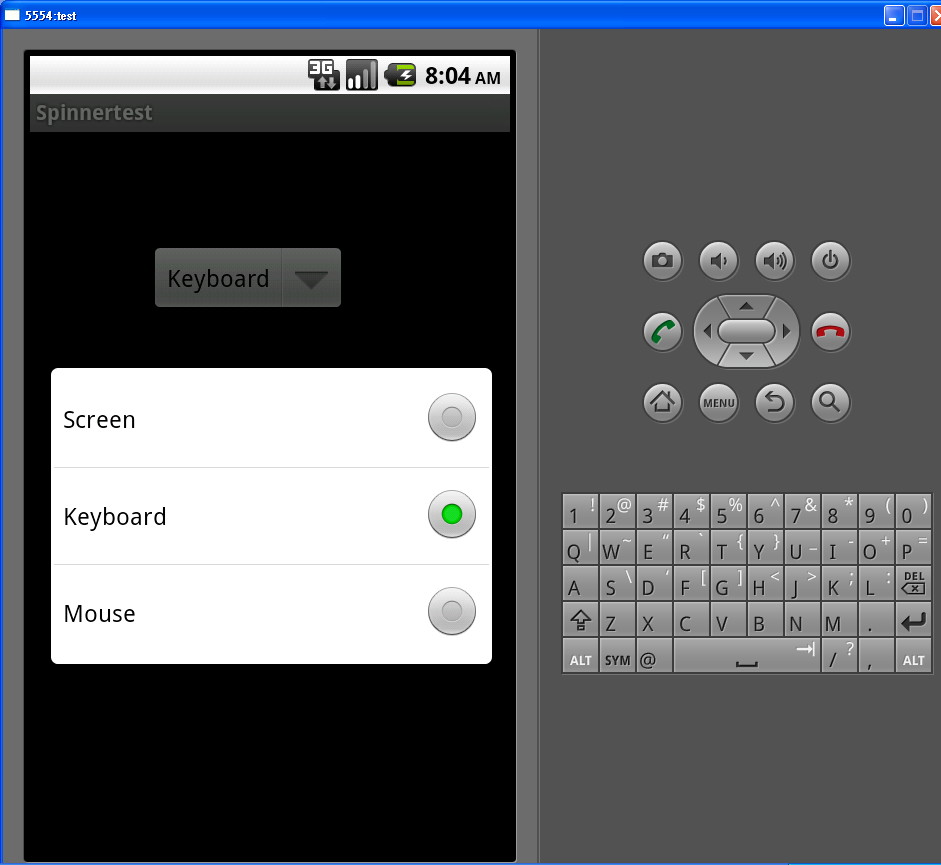

這個如果在搭配上其他的物件,
例如說時間或者是其他按鈕時,
就會有不一樣的程式嚕。